Monday, August 25, 2008

Knitted Mesh Backpack Pattern

mesh backpack, full of books

US 8 straight needles.
5 oz Red Heart Super Saver yarn--yeah, I know all the other bag patterns say "cotton", but this is my book bag. I want indestructible. I used the Sunshine Print colorway.
Crochet hook, whatever size you prefer (I used a G because that's all I have).

These instructions give about a 12"x12" backpack, empty. It'll stretch quite a ways, so don't make it too big if you don't want lumbar problems.

Cast on 39 sts using long-tail cast on; purl one row. (This gives a sturdier edge.)

Row 1: *K2tog, yo; rep from * across, end k1.

Row 2 and all WS rows: purl.

Row 3: K1, *yo, k2tog; rep from * across.

Work in patt till piece measures 24" long. Use this stretchy bind-off: k1, *yo, pass k st over yo, k1, pass yo over k st; rep from * to end. Do NOT cut yarn or fasten off.

Place last loop on crochet hook. Fold piece in half, placing CO and BO edges together. Crochet side edge together; I used the following method, which produces a good stretchy edge.

*Sc in hole below CO edge. Ch 1. Sc in hole below BO edge. Ch 1. Rep from * down, alternating sides and placing 1 sc in each hole along edges, with a ch between each one. It'll look a little bulgy when the bag is empty, but believe me, you'll need the flexibility when you fill it.

mesh backpack, flat

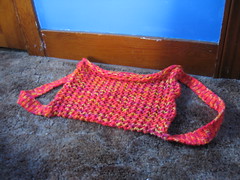
When you run out of holes to single-crochet in, do NOT fasten off; ch 1, turn. Work 7 single-crochet sts back along joined edge--spreading them out more than normal is a good idea. Ch 1, turn.

Work even in single crochet over these 7 sts until strap measures about 12-14 inches. When it's long enough, fasten free end of strap to CO edge by crocheting into strap and CO edge at the same time.

Before fastening the strap, you need to be sure it's twisted the right way; it's hard to explain. Hold the backpack against your back as if you're wearing it, and make sure the strap lies (more or less) flat against your body all the way up.

Once the strap is attached, you can finally fasten off, leaving a nice longish end to weave in--remember, this critter is going to take some hard wear. You don't want the strap giving way because your fasten-off came undone.

Now join the yarn at the other top corner, on the side you haven't seamed up yet, and repeat the whole process from "Crochet side edge together", way up ⇑ there. Weave in those two ends, and you're done!

You can make an iCord drawstring if you want, especially if you'll only be carrying light loads, but you don't really need it. This is a very well-behaved backpack.

mesh backpack, bundled up

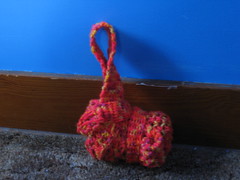
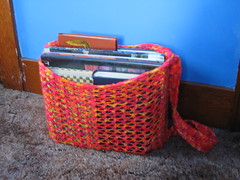
To bundle it up like this picture, with a handy loop to hang it from your bike handlebars, just fold it in half--either way, doesn't matter--then roll it up so the long edge curls around. (How am I supposed to describe this stuff? sigh...) Twist one strap around it, rather like a ponytail elastic, and the other strap forms the loop.

Copyright (insofar as a mesh bag pattern can ever be copyright) August 2008 by Maria Grace McClamrock, aka "telcontar" on Ravelry.

Sunday, August 24, 2008

Mitered-Square Baby Bonnet

bonnet_on_dog

Okay, this dog was not inconvenienced in any way in the taking of this picture. When I actually photographed the bonnet, my Styrofoam skull GK was wearing it. However, several people have asked me to change the picture, so Kate (propertrappings on Ravelry) kindly Photoshopped me this doggie picture. There will hopefully be a proper baby picture at some future date...

This bonnet is worked from side to side, using mitered-square shaping. The ruffle is crocheted on afterwards.

Yarn: About 1.75 oz of Bernat Super Value or other worsted-weight yarn. Needles: US 8 DPNs and straights. (Note: KnitPicks Options needle tips in the appropriate size make great DP substitutes!) Hook: I used a G because that's what I had. Use whatever size works for you with your yarn.

Measure recipient's head, under the chin, over the ears and top of the head. Babies have incredibly large heads, so don't skip this step! Sample sizing is given for a 17-inch measurement, with basic instructions to adapt.

CO 3 sts on DPNs. Work iCord for 6-8 inches. Mark middle stitch.

Row 1 and odd-numbered rows: K to just before marked st, e-loop inc, k marked st, e-loop inc, k to end. (Those familiar with the ubiquitous Baby Surprise Jacket will recognize this procedure. They will also recognize that I can't even think "Baby Surprise Jacket" without going all Elizabeth Zimmermann in my language. sigh...)
Row 2 and even rows: Knit.

Work mitered square as established till centerline measures 5 inches (or a little less than 1/3 of baby's head circumference, as measured above). Work even in garter st for another 5 inches (or another 1/3 of head circumference). Mark middle st.

Odd rows: K to 1 st before marked st, sl 1, k2tog, psso, k to end.
Even rows: Knit.

Work mitered square as established till 3 sts remain. Work iCord on these 3 sts till length matches first iCord. Bind off and weave in ends.

With crochet hook (duh--what else would you crochet with? sorry) join new yarn and work 1 double-crochet in every garter ridge. Ch 3, turn.

Work dc in base of turning chain. Work 2 dc in every dc across. Ch 1, turn.

Work ruffle edge, 1 st in each st below, in this patt: single crochet, *double crochet, triple crochet, double crochet, single crochet, rep from * across. It won't quite come out even--fudge it! Fasten off and weave in the end.

Put it on the baby in question. I promise you, it'll look cuter than it does on GK the Skull.

Oh yeah--this pattern copyright August 2008 by Maria Grace McClamrock, aka "telcontar" on Ravelry, aka "Maria Grace" on the Ravelry Designers.

Friday, August 8, 2008

Ravelympics on YouTube!

Okay, I admit it--I'm posting this mainly because the music is so awesome! If anybody knows what that music is, will they please tell me?

Friday, August 1, 2008

Lego Knitting Machine

This is the most utterly incredible contraption I have ever seen--a motorized I-Cord knitter built entirely out of Legos. Somebody posted a link to the video in the GeekCraft group on Ravelry this morning, and I just had to blog it.