Be sure you read all instructions before beginning. I'm afraid they may be a little jumbled. If you can't make sense of something, leave a comment and I'll try to get back to you.
This makes about a boys' size 8. Instructions for changing the size are given in italics. It's based on a gauge of about 16 stitches to 4" and 23 rows to 4", using worsted-weight yarn and US 9 needles. Don't knock yourself out trying to get gauge--just make sure you know what gauge you're working at, and check the dimensions often.
Yarn: Red Heart Super Saver in White, Cherry Red, and Royal.
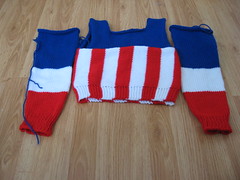
Vertical stripes:
Using a provisional cast on and red yarn, CO 36 sts. This gives a length of about 9" from the bottom of the armhole in gauge. Measure the intended wearer and adjust if necessary.
Work as follows:
Row 1: K across
Row 2: P 8, K to end
AT THE SAME TIME working in color pattern: 10 rows red, 10 rows white
until work measures about 28", making sure to finish with 10 white rows. Length of work should be a few inches longer than the waist or chest circumference of the intended wearer, whichever is bigger. I worked 16 stripes.
Graft end of work to provisional CO.
Note: If you prefer not to graft, simply use your preferred cast-on, work as instructed, then bind off and sew ends together.
You should now have a ring of striped stockinette stitch with garter-stitch "ribbing" along one edge. Lay it flat with seam/graft at one edge, to fall under arm, unless it's totally invisible or you don't care.
Yoke:
Using blue yarn, pick up stitches along stockinette edge of stripy piece for half its length. This joins one edge of the yoke to the body of the sweater. I picked up about 7 stitches to every 10-row stripe for a total of 56 stitches over 8 stripes. If you worked more or less than 16 stripes, adjust total number of picked-up stitches.
Work in stockinette (making sure right sides of blue and red/white work face the same way) for 5-1/2". This will give a total back waist length of 14 inches. Adjust as necessary.
Neck Opening:
Work 17 sts, join new yarn, bind off 22, work rem 17. Working both sides at once with separate strands of yarn, work 5-1/2" in stock st. Work first 17 sts, cast on 22, work rem 17. Cut "new" yarn. These instructions will give a square neck opening 22" around. Feel free to adapt neck shaping. Measure intended wearer's head if you do--you'd be amazed how big a small boy's head can be.
Work all sts in stockinette for 5 1/2 more inches. Graft to other half of stripy portion's stockinette edge, or bind off and sew. These Yoke instructions, in gauge, should produce a 16-1/2" circumference armhole. If a smaller armhole is desired, cast on more stitches for Vertical Stripes and work Yoke to a shorter length before and after Neck Opening.
Sleeves (make 2):
If you have circular needles, pick up stitches around armhole. If not, work sleeves flat on straight needles, sew seam, then set in to armholes.
Pick up or cast on 64 sts with blue yarn. This is for 16" armhole. If you changed the armhole size, change number of CO sts to correspond.
Work stockinette st for 1". Decrease 2, spaced however you like. Continue in stockinette, decreasing 2 sts every 2" and AT THE SAME TIME working color patt: blue for 8", white for 4", red for 4". (You should have 48 stitches, unless you changed the armhole size.) Work knit 1, purl 1 rib with red yarn for 2". Bind off in rib.
Collar:
Using blue yarn and circular needles, pick up 22 sts on each side of square Neck Opening for a total of 88 sts
OR
Using straight needles, cast on 88 sts.
Work in k1p1 rib until collar is tall enough. Mine was about 1-1/2". A turtleneck collar should be at least 3". Bind off in rib.
Variations:
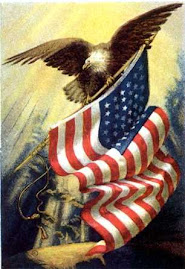
If you want to add a mask like Captain America's, simply substitute a ski mask, with 2 holes for the eyes and one for the mouth/chin, instead of the collar. Cap's costume also has a white capital "A" above the eyeholes of the mask, a white star on the front of the yoke and another on the back. You can graph these using knitter's graph paper, available for free from various web sites, and duplicate-stitch them on or work them in intarsia.
If you used circular needles, weave in all ends. You're done.
If you used straight needles, sew sleeve seams, set in sleeves, sew collar seam, sew on collar, and weave in ends. Now you're done.
This is an original pattern, copyright Maria Grace McClamrock 2008, based on a costume design by Jack Kirby from 1940. This is a fandom tribute and nobody is deriving any profit from it, yadda yadda Yoda.